Manual - Mappetizer Travel Diary by uismedia
Homepage
http://www.mappetizer.de/traveldiary/index.htmlTerms of use
Mappetizer Travel Diary is only for private and personal use, so you are not allowed to use it for any commercial purposes.
Please contact us, if you want to use this kind of application for commercial purposes.
Feel free to put it on the web or use it on your local machine. The application uses OpenStreetMap (http://www.openstreetmap.org), Dojo Toolkit (http://www.dojotoolkit.org) from AOL CDN and services of GeoNames (http://www.geonames.org), so you need access to the internet.
Personal copies of the Travel Diary are non-transferable so do not change the title tag in the index.html file.
Please do not drop the line "Mappetizer Travel Diary by uismedia" in the About tab.
Please do not delete the links to the Open Source projects, to infringe any copyright.
Feel free to change the layout of the Mappetizer Travel Diary, but be aware this is in a way a complex application, so it might be that nothing works anymore after making only a few minor changes. So we do recommend to make a copy before you start to change the layout.
Version
Configure your Travel Diary
Things for you to change or adapt you will find in the folder gpxdata. On the top level of this folder there are the two files gpxconfig.xml and gpxinterface.xml. Do not change the name of the folder, and the names or the locations of these two files, otherwise the application will not run. While the gpxconfig.xml file organizes the structure of your travel diary, the gpxinterface.xml file maintains the captions and headings of the information you want to give about your tracks and waypoints.
All these files are based on XML, the Extensible Markup Language. If you are not familiar with this language, you will find a lot of examples on the internet. A good introduction to the subject you might find on Wikipedia, http://en.wikipedia.org/wiki/XML.
But the easiest way will be to have a look on the gpxdata folder which is provided as an example for you. We do recommend to make a copy of this folder, so you can always go back to it.
Start your application with opening the index.html file.
gpxconfig.xml
The gpxconfig.xml file has the following structure:
	<?xml version="1.0" encoding="UTF-8"?>
	<mappetizer>
	   <gpxLayer>
	      <gpxLayer>
	         <gpxfile>freising/walking/office.xml</gpxfile>
	      </gpxLayer>
	      <gpxLayer>
	         <gpxfile>freising/nordicwalking/nw2.xml</gpxfile>
	      </gpxLayer>
	   </gpxLayer>
	   <gpxLayer>
	      <gpxfile>freising/sundaytrips/silly_drive.xml</gpxfile>
	   </gpxLayer>
	</mappetizer>
Each gpxLayer makes an entry in the legend and can be seen as a sort of a chapter, so it allows you to organize your travel diary.
A gpxLayer may include other gpxLayer(s), as sub chapters/layers. This kind of gpxLayer can be seen as a "group layer" unlike those layers which include one ore more <gpxfile>.
So when you start to build up your Travel Diary your gpxconfig.xml file may look like this:
	<?xml version="1.0" encoding="UTF-8"?>
	<mappetizer>
	   <gpxLayer>
	      <name>Walks in Freising</name>
	      <gpxLayer>
	         <name>Frequent walks</name>
	            <renderer>
	            <type>uniqueValue</type>
	            <wptInLeg>true</wptInLeg>
	            <trkMrk offset="20%" type="onTrack">true</trkMrk>
	         </renderer>
	         <analyses>
	            <calcDeparture>true</calcDeparture>
	            <calcLength>true</calcLength>
	            <calcHeight>true</calcHeight>
	            <calcDur>true</calcDur>
	            <doWikipedia>true</doWikipedia>
	         </analyses>
	         <sym>
	            <trk>
	               <stroke-width>3</stroke-width>
	            </trk>
	            <wpt>
	               <img src="images/poi/magenta.png" width="18px" height="18px">
	               </img>
	            </wpt>
	            <mrk>
	               <img src="images/walking/magenta.png" width="18px" height="18px">
	               </img>
	            </mrk>
	         </sym>
	         <gpxfile>freising/walking/office.xml</gpxfile>
	         <gpxfile>freising/walking/dininghall.xml</gpxfile>
	         <gpxfile>freising/walking/dininghall2.xml</gpxfile>
	      </gpxLayer>
	      <gpxLayer>
	         <name>Nordic Walking Tours</name>
	         <renderer>
	            ....
	         </renderer>
	         <analyses>
	            .....
	         </analyses>
	         <sym>
	            ....
	         </sym>
	         <gpxfile>freising/nordicwalking/nw1.xml</gpxfile>
	         <gpxfile>freising/nordicwalking/nw2.xml</gpxfile>
	      </gpxLayer>
	      <gpxLayer>
	         <name>Sunday trips</name>
	         ....
	      </gpxLayer>
	   </gpxLayer>
	</mappetizer>
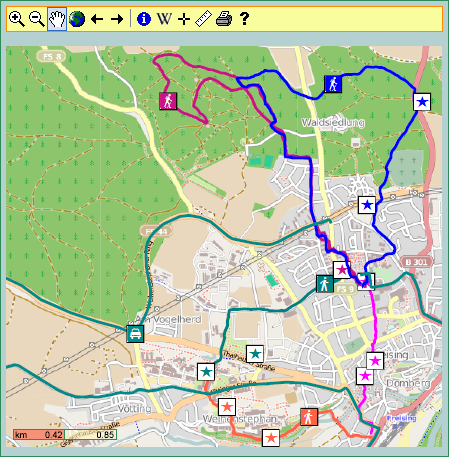
The upper example will look like this in your legend

View the gpxconfig.xml file of Ruthle's Travel Diary as an example.
Tip:
If you make any changes within the gpxconfig.xml file, the gpxinterface.xml file or the XML files of your tracks, it might be necessary to clean the cache of your browser, otherwise you won't see the updates.
Settings of a gpxLayer
Name tag <name/>
"Group layers" as well as "real layers" must have a name. Type in the name of the layer/folder which will be noted in the legend behind the rectangle where you can switch on/off the layer.
Renderer tag <renderer/>
	<renderer>
	   <type>uniqueValue</type>
	   <wptInLeg>true</wptInLeg>
	   <trkMrk offset="50%" type="onTrack">true</trkMrk>
	</renderer>
<type/>
Type can be either uniqueValue or singleSymbol. UniqueValue makes a legend entry for each gpxfile in the gpxLayer, singleSymbol only makes one legend entry for all gpxfiles within this <gpxLayer>.
<wptInLeg/>
If you have waypoints in your track and want to symbolize the waypoint icon in your legend you can set this to true.
<trkMrk/>
Adds a specified marker symbol (track marker) to your track on the map (see below chapter Symbology).
Analyses tag <analyses/>
Mappetizer Travel Diary provides a few technical analyses about your track which are displayed in the information window.
	<analyses>
	   <calcDeparture>true</calcDeparture>
	   <calcLength>true</calcLength>
	   <calcHeight>true</calcHeight>
	   <calcDur>true</calcDur>
	   <doWikipedia>true</doWikipedia>
	</analyses>
<calcDeparture/>
Set to true or false. If it is set to true, the application makes a request to the GeoNames (http://www.geonames.org) WebServices "findNearby". Information about the location at the given latitude/longitude are taken over and displayed in the information window about the track.
<calcLength/>
Set to true or false. If it is set to true, the length of your track will be calculated by the latitude/longitude values of your track.
<calcHeight/>
Set to true or false. If it is set to true, the total height difference, max and min height above sea level will be taken over resp. calculated from the <ele>480.80</ele> values of your track.
We recommend to make a sanity check on your data. We realized that especially the very first and last data of the track showed wrong elevation data.
<calcDur/>
Set to true or false. If it is set to true, the length of time will be calculated from the <time>2009-11-29T09:53:25Z</time> values of your track.
We recommend to make a sanity check on your data. We realized that especially the very first and last data of the track showed wrong time data.
<doWikipedia/>
Set to true or false. If it is set to true, one or more buttons are added to the description of your track and a request to the GeoNames WebServices "findNearbyWikipedia" is made. There will be a button for the application's language, English language, and the given language of the track's location.
Symbology tag <sym/>
The symbology of a track contains the symbol for the track (line) itself <trk>, the icon for the track marker <mrk> (in this example the car, hiker and walker) and the icons for the waypoints <wpt> (here stars) you want to place on or beside your track . The purpose of the track marker icon is to characterize the track (e.g. as a hiking track) and that you will see it on the map at any scale (clicking on a track marker actually zooms directly to that track).
The symbology is noted hierarchically and can be set at different locations. So it might be useful that within the gpxconfig.xml file you maybe only set the stroke-width of the track, but the color within each gpxfile (if you wish, that each track has a different color).
	<sym>
	   <trk>
	      <stroke-width>3</stroke-width>
	   </trk>
	   <wpt>
	      <img src="images/poi/magenta.png" width="18px" height="18px"></img>
	   </wpt>
	   <mrk>
	      <img src="images/walking/magenta.png" width="18px" height="18px"></img>
	   </mrk>
	</sym>
Symbology of waypoints and track markers
Mappetizer Travel Diary supports images as well as circles as waypoint markers <wpt> or track markers <mrk>. The xml tag for an image looks like
	<wpt> or <mrk>
	   <img src="images/poi/magenta.png" width="18px" height="18px"></img>
	</wpt> or </mrk>
The xml tag for a circle looks like
	<wpt> or <mrk>
	   <fill>green</fill>
	   <stroke>black</stroke>
	   <stroke-width>1</stroke-width>
	   <r>5</r>
	</wpt> or </mrk>
where <fill> means the color of the circle, <stroke> the outline color, <stroke-width> the width of the outline and <r> the radius of the circle.
The color can be noted as rgb values like rgb(255,13,178), as Hex triplet like #FFCCAA or as a spoken SVG (Scalable Vector Graphics) known color name like dodgerblue or olivedrab (see list under http://www.w3.org/TR/css3-color). <fill>none</fill> can be noted if you wish for example a circle without a color and only with an outline.
Avoid using red as a color, since red is the highlight color.
Symbology of tracks
The xml tag for a track (line) looks like
	<trk>
	   <stroke>tomato</stroke>
	   <stroke-width>3</stroke-width>
	</trk>
where <stroke> is the color of the line, <stroke-width> the width of the line. The color has to be noted as described above.
gpxfile tag <gpxfile/>
Within this tag you set the pathname to your gpxfile(s). Each "real layer" can have one or more of those gpxfiles.
<gpxfile>freising/walking/office.xml</gpxfile>
gpxinterface.xml
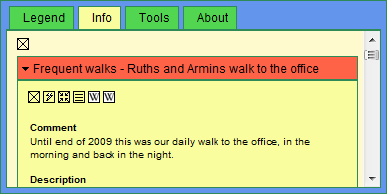
Within the gpxinterface.xml file the terms for display (captions and headings) are set. For example if you want to make a comment about your track you will note that within the specific gpxfile like this:
	<cmt>
	   Until end of 2009 this was our daily walk to the office,
	   in the morning and back in the night.
	</cmt>
What you will see then as the heading to this comment (here "Comment") is actually defined in the gpxinterface.xml and can be changed there.
The gpxinterface.xml has the following structure:
	<?xml version="1.0" encoding="UTF-8"?>
	<mappetizer>
	   <interface>
	      <region name="global">
	         <cmt>
	            <de>Bemerkung</de>
	            <en>Comment</en>
	         </cmt>
	         <desc>
	            <de>Beschreibung</de>
	            <en>Description</en>
	         </desc>
	         <imgTrk>
	            <de>Tour Galerie</de>
	            <en>Tour Gallery</en>
	         </imgTrk>
	         <imgWpt>
	            <de>Ansichten</de>
	            <en>Views</en>
	         </imgWpt>
	      </region>

	      <region name="address">
	         <address>Address</address>
	         <phone>Phone</phone>
	         <fax>Fax</fax>
	         <street>Street</street>
	         <zipCodeCity>Postal code, city</zipCodeCity>
	      </region>
	   </interface>
	</mappetizer>
Each comment, heading, term etc. has to be noted within a region tag <region/>. The file is subdivided into different regions, but this is only done for the purpose of clarity.
Multilingualism
Mappetizer Travel Diary supports multilingualism. So you can expand the used terms, for example <cmt/>, for different languages:
	<cmt>
	   <de>Bemerkung</de>
	   <en>Comment</en>
	   <fr>Remarque</fr>
	   <it>Commento</it>
	   <es>Comentario</es>
	</cmt>
In your gpxfile file of the specific track you will then type something like this:
	<cmt>
	   <en>
	      Until end of 2009 this was our daily walk to the office.
	   </en>
	   <de>
	      Dies war bis Ende 2009 unser täglicher Arbeitsweg.
	   </de>
	   <fr>
	      ....
	   </fr>
	</cmt>
Tip:
For the language shortcut (e.g. <en/>), we recommend to take over the international short codes for language names http://en.wikipedia.org/wiki/ISO_639.
To complete the multilingualism of your Travel Diary you have to implement somewhere on your page (index.html file in your application) radio buttons or a drop-down list, so the user can choose the language.
One idea is to implement a drop-down list in the toolbar <div id="MVtoolbar"></div> of your application like
	<div id="MVtoolbar" dojoType="dijit.Toolbar">
	   ....
	   <div dojoType="dijit.form.DropDownButton" id="MVtoolbar.Language"
	      showLabel="true">
	      <span>Language</span>
	      <div dojoType="dijit.Menu">
	         <div dojoType="dijit.MenuItem" onClick="mv_changeLang('en')">
	            English
	         </div>
	         <div dojoType="dijit.MenuItem" onClick="mv_changeLang('de')">
	            German
	         </div>
	      </div>
	   </div>
	</div>
Whatever solution you prefer, the calling function is mv_changeLang('de'), with the language shortcut as a parameter value.
Setting a default Language
Mappetizer Travel Diary doesn't expect you to translate all entries of your track. So you might only translate the name <name/> of the track and the comment <cmt/> but not the more detailed description <desc/> of your track. In this case just make your description without a country sub-tag, e.g.
	<desc>
	   Our daily walk to the office lead us cross the city of Freising.
	</desc>
If you have more than two languages supported or have a mixed language support you might set a default language. So whenever the specific language is not supported for a given tag (but there exist more than one translation/language for this tag) the application falls back to its default language. The default language can be set in the variablen.js file (see chapter "Further settings").
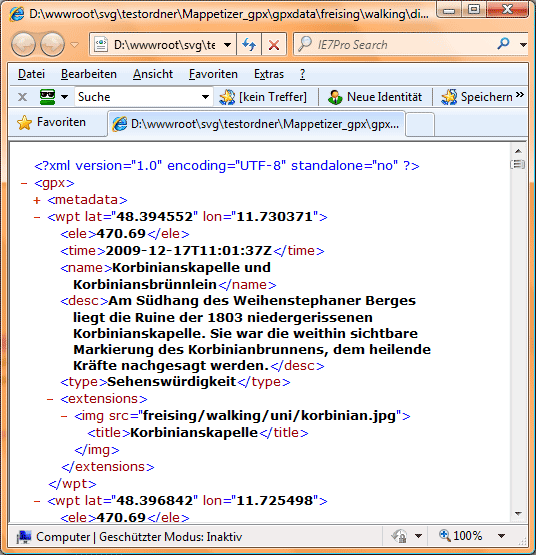
GPX / XML-Files (Files within the gpxfile tag <gpxfile/>)
These files are actually your "real" track files, which will be displayed on the map and which supplies other information displayed in the Info tab.
Mappetizer takes over your gpx files from your GPS, but you first have to make some changes on it:
- Change the extension of your .gpx file to a .xml file.
- Clear the gpx tag from its attributes:
The gpx tag (which is the second entry of your gpx file) may look like this:
Delete all attributes, that it looks like this:<gpx xmlns="http://www.topografix.com/GPX/1/1" xmlns:gpx="http://www.garmi.... "><gpx> - Support of special characters
If your language includes special chars like ä, é, ... you have to be sure that the first line looks like this:
<?xml version="1.0" encoding="UTF-8"?>AND the format of your file is "Encode in UTF-8".
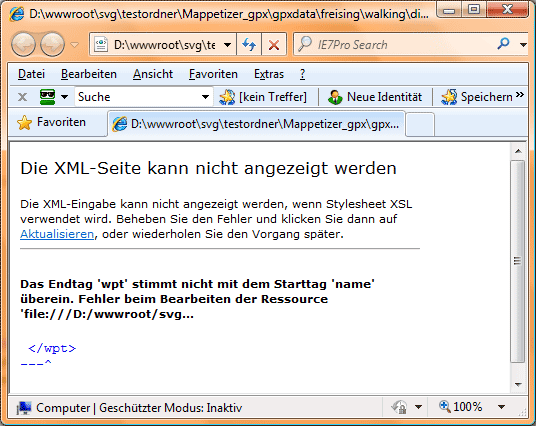
Tip:
For checkup the validity of your file (as all XML files), open the file in your browser. You have to see the whole file in a XML likewise syntax, as seen on this picture:
If a line comes up "The XML page cannot be displayed" your file is not valid. There might be unclosed tags, or special chars. Please have a look on the specific line in your file, which is mentioned in the error report.
The XML files of Mappetizer Travel Diary takes over as far as possible the GPX 1.1 Schema Documentation, http://www.topografix.com/gpx/1/1.
So, beside the metadata tag, each file can contain
0...n waypoints,
0...n tracks.
and may look like this:
	<?xml version="1.0" encoding="UTF-8" standalone="no" ?>
	<gpx>
	   <metadata>
	      ....
	   </metadata>
	   <wpt lat="48.394552" lon="11.730371">
	      ....
	   </wpt>
	   <wpt lat="48.396842" lon="11.725498">
	      ....
	   </wpt>
	   <trk>
	      ....
	   </trk>
	</gpx>
Usually your file will contain at least one track or at least one waypoint. The idea of the waypoints is to describe interesting points along your track.
View one of the gpxfiles of Ruthle's Travel Diary as an example.
Track tag <trk/>
A track may look like this
<trk>
<name>My daily walk to the dining hall at University Weihenstephan</name>
<cmt>
To this place I am going to eat since almost 30 years now!
... and I am still alive.
</cmt>
<desc></desc>
<extensions>
<renderer>
<trkMrk offset="30%" type="onTrack">true</trkMrk>
</renderer>
<sym>
<trk>
<stroke>tomato</stroke>
</trk>
<mrk>
<img src="images/walking/tomato.png"></img>
</mrk>
</sym>
<transport>walking</transport>
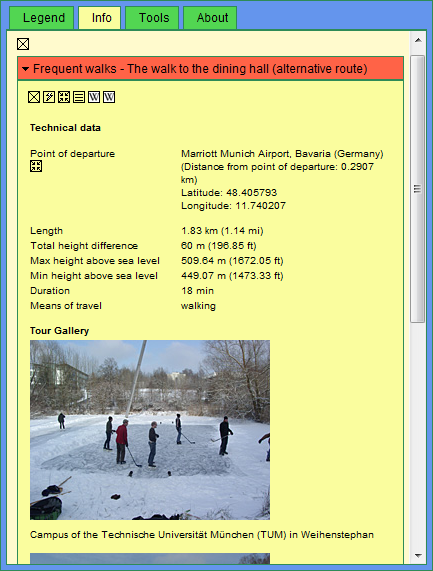
<img src="freising/walking/uni/lastsnow.jpg">
<title>The last snow in March trys to hide behind the handrail.</title>
</img>
<img src="freising/walking/uni/baerlauch.jpg">
<title>Bear's garlic on the way to the dining hall.</title>
</img>
</extensions>
<trkseg>
<trkpt lat="48.394726" lon="11.741616">
<ele>438.02</ele>
<time>2009-12-17T10:50:27Z</time>
</trkpt>
<trkpt lat="48.394638" lon="11.741621">
<ele>437.54</ele>
<time>2009-12-17T10:50:38Z</time>
</trkpt>
.....
</trkseg>
</trk>
Waypoint tag <wpt/>
A waypoint may look like this
	<wpt lat="48.406148" lon="11.741059">
	   <name>Freising Cathedral</name>
	   <cmt>
	      Freising Cathedral, also called Saint Mary and Corbinian Cathedral
	      (German: Mariendom), is a romanesque basilica in Freising, Bavaria.
	      It is the co-cathedral of the Catholic Archdiocese of Munich and Freising.
	   </cmt>
	   <desc>
	      After a fire had destroyed the old cathedral,
	      the church was constructed from 1159 onwards and consecrated in 1250.
	      St Mary's cathedral was the first brick structure
	      to be built north of the Alps since ancient times.
	   </desc>
	   <type>Monument</type>
	   <extensions>
	      <img src="freising/city/cathedral.jpg">
	         <title>Saint Mary and Corbinian Cathedral</title>
	      </img>
	   </extensions>
	</wpt>
Tip:
To get the lat/lng values for positioning your waypoint, just use the coordinate-readout of the application.
Supported Tags within the track and the waypoint tag
Most of the supported tags will be seen within the information window. When you click on a waypoint or on a track in the map, the "Info" tab will be focused and the information of the specific waypoint or track will be shown:
Name tag <name/>
The name of the waypoint or track: it will be displayed when you move with your cursor over the icon in the map, or as the header in the information window.
Comment tag <cmt/>
Comment, some short information will be displayed in the information window. Returns are supported.
Description tag <desc/>
Description, further information will be displayed in the information window. Returns are supported.
Type tag <type/> (only waypoints)
Sort of classification (restaurant, landmark, monument, etc.), which will be displayed in the header of the information window.
Link tag <link/>
Each link tag will be displayed as a link to an external resource (web page, digital photo, video clip, etc.) with additional information.
	<link href="http://www.studentenwerk-muenchen.de/mensa/">
	   <text>The student cafeteria</text>
	   <type>Link</type>
	</link>
where <text> is the (visible) name/description of the link, <type> is the kind of the link (e.g. link, e-mail, etc.).
Extensions tag <extensions/>
Further information you wish to add to your description about a waypoint or a track might be included in the tag extensions:
<renderer/> (only tracks)
Properties about rendering are normally done in the gpxconfig.xml file, they apply to the whole gpxLayer. It might be, that the position of a track marker unfortunately covers a waypoint, so you might like to change the track markers offset here.
	<extensions>
	   <renderer>
	      <trkMrk offset="20%" type="onTrack">true</trkMrk>
	   </renderer>
	</extensions>
<sym/>
As mentioned, the symbology is noted hierarchically and can be set at different locations. As it might be useful to set the stroke-width of the track within the gpxconfig.xml (so it is of the same size for all tracks within that gpxLayer), you maybe want to set different colors for each track within that gpxLayer.
So within the Track tag <trk/> you might note the symbology like this:
	<extensions>
	   <sym>
	      <trk>
	         <stroke>teal</stroke>
	      </trk>
	      <mrk>
	         <img src="images/walking/teal.png" width="18px" height="18px"></img>
	      </mrk>
	   </sym>
	</extensions>
Within the Waypoint tag <wpt/> the symbology has to be noted like this:
	<extensions>
	   <sym>
	         <img src="images/poi/teal.png" width="18px" height="18px"></img>
	   </sym>
	</extensions>
<analyses/> (only tracks)
As well as the symbology the analyses tag is noted hierarchically and can be set within a track if you want to have a different behaviour for your tracks within a gpxLayer.
	<extensions>
	   <analyses>
	      <calcDeparture>false</calcDeparture>
	   </analyses>
	</extensions>
<img/>
You might include images to the description of your waypoint or track.
	<extensions>
	   <img src="freising/walking/uni/wzw.jpg" width="240px" height="180px">
	      <title>Wissenschaftszentrum Weihenstephan</title>
	   </img>
	</extensions>
where <title> is the caption of the image. You might add width and height to the <img> tag, if the image has to be scaled.
<slides/>
Behind each image you can insert a slide show if you like. So if you click on the image, a lightbox will pop up, where all the images are presented then.
For this you have to extend the tag <img/> like this:
	<img src="freising/walking/uni/wzw.jpg">
	   <title>Center of Life and Food Science Weihenstephan</title>
	   <slides>
	      <img src="freising/walking/uni/wzw1.jpg">
	         <title>Building of the Research Department Plant Sciences</title>
	      </img>
	      <img src="freising/walking/uni/wzw2.jpg">
	         <title>Building of the Research Department Biosciences</title>
	      </img>
	   </slides>
	</img>
<spec/> (only tracks)
The specificaton tag <spec/> describes your track for different parameters ("Technical data"). You can extend these information with your own sub tags. Captions, headings and terms can be added (or changed) in the gpxinterface.xml file. If you have choosen different analysis functions (<analyses/>) the sub-tags <departure/>, <length/>, <height/>, and <dur/> will be overwritten by the application. If you delete one of those sub-tags it won't be considered at all.
	<extensions>
	   <spec>
	      <departure>Vimystraße 1b</departure>
	      <length>300 m</length>
	      <height>100 m</height>
	      <dur>1 hour</dur>
	      <texture>Asphalt</texture>
	      <date>Daily</date>
	   </spec>
	</extensions>
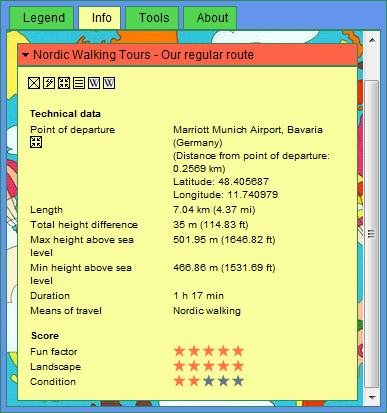
<score/> (only tracks)
You might add a score tag <score/> to your track, which shows the respective category (1 to 5 stars) for different parameters. You can extend these information with your own sub tags. Captions, headings and terms can be added (or changed) in the gpxinterface.xml file.
	<extensions>
	   <score>
	      <fun>5</fun>
	      <landscape>5</landscape>
	      <cond>2</cond>
	   </score>
	</extensions>
<transport/> (only tracks)
The transport tag <transport/> is to specify your track. Captions, headings and terms can be added (or changed) in the gpxinterface.xml file.
	<extensions>
	   <transport>walking</transport>
	</extensions>
<address/> (only waypoints)
If you add an address tag <address/> to your waypoint, all sub tags within this tag will be listed in the information window as an address. You might extend these information with your own sub tags. Captions, headings and terms can be added (or changed) in the gpxinterface.xml file.
	<extensions>
	   <address>
	      <street>Am Staudengarten</street>
	      <zipCodeCity>85354 Freising</zipCodeCity>
	      <phone>08161 / 71-0</phone>
	   </address>
	</extensions>
<custom/>
Further preformatted information can be set like this
	<extensions>
	   <custom>
	      <poi>
	         <dining>Restaurants, Beer gardens</dining>
	         <culture>
	            <museum>Open-air museum</museum>
	            <church>Most beautiful village church of the world</church>
	         </culture>
	         <activities>
	            <swimming>Lake Zeller</swimming>
	            <swimming>Lake Olzreute</swimming>
	            <boating>Lake Schwaigfurt</boating>
	         </activities>
	      </poi>
	   </custom>
	</extensions>
Metadata
Extensions tag <extensions/>
Within the metatag of your GPX/XML file you may also set the symbology of your waypoints, tracks or track markers. This might be a good place to do so, if all your waypoints of this track share the same icon.
	<metadata>
	   <extensions>
	      <sym>
	         <wpt>
	            <img src="images/poi/teal.png"></img>
	         </wpt>
	      </sym>
	   </extensions>
	</metadata>
All other tags within the metatag are not supported.
Organizing your data
The root folder for your data is the gpxdata folder in your Mappetizer Travel Diary. Below this you can organize your files just as you like. To achieve a sufficient level of clarity we recommend to store your files in different sub folders, for example one for each journey, below this one for each track, the images for each track/journey are maybe stored in separate subfolders.
Do not use blanks or special characters (like ä,é) when naming your files and folders.
The files are then noted as usual path names down to the specific subfolder, like
	<gpxfile>freising/walking/office.xml</gpxfile>
	<img src="freising/walking/uni/lastsnow.jpg">
Further settings
variablen.js file
Further settings can be done in the file variablen.js which is located in the folder embfiles.
Inital Zoom-Extent
Mappetizer Travel Diary starts with the full extent of the world, but if you want to change the initial zoom extent you might comment out the line mv_zoomToLatLng in the function mv_userInit(), like
	function mv_userInit() {
	   //This function is for your own scripts, it will be called on loading,
	   //do not delete it
	   //mv_alert("function mv_userInit()");
	   mv_zoomToLatLng(55.1968,55.8298,-20.8670,-21.3749);
	}
The parameter values are longitude left, longitude right, latitude top, latitude bottom. So in this example you will get to one of the most beautiful places on earth.
Tip:
To get the latitude/longitude values for your extent, zoom to the area and use then the coordinate-readout of the application.
Setting a default language
As Mappetizer Travel Diary supports multilingualism and directly refers to the gpxinterface.xml file, you may have to change the variable mv_Doc.Lang to your language.
If you want to support multilingualism, but can't provide all translations we recommend to set the variable mv_Doc.DefLang. So whenever the specific language is not supported for a given tag (but there exist more than one translation/language for this tag) the application falls back to its default language.
You find both variables in the function mv_initializeSettings2().
	function mv_initializeSettings2() {
	  //Do not delete or change this function;
	  mv_Doc.Lang = "de"; // German
	  mv_Doc.DefLang = "de"; // German
	}
Loading configuration
The loading of the legend (initialization of the application) will actually be done with calling the function mv_getGPXLayers(). This function provides three different parameters, false, true or "firstOpen". While "firstOpen" opens the first folder (and maybe loads already some tracks, if the first gpxLayer is a "real layer"), false turns off all layer/chapters, true loads all tracks right away. We do not really recommend the parameter true, especially if your application includes a lot of tracks.
	function mv_initializeSettings2() {
	  //Do not delete or change this function;
	  //mv_getGPXLayers(false);
	  //mv_getGPXLayers(true);
	  mv_getGPXLayers("firstOpen");
	}
Changing the layout
Mappetizer Travel Diary uses JavaScript library Dojo Toolkit (http://www.dojotoolkit.org), and the Dojo's UI Library, called Dijit. Please have a look there for further functionality provided by Dijit.
Changes of colors, font-sizes etc. can be done within the CSS files in the folder embfiles, where the file style.css provides all styles for the layout widgets, if not noted directly in the index.html file.
We do recommend to make a copy of your Travel Diary before you start to change the layout.
Support / FAQ
Not yet implemented so far...
Please report any bugs, suggestion or wishes to support@mappetizer.de
uismedia Lang & Müller
Unterer Öschweg 16/1
D-88427 Bad Schussenried
Tel: ++49 (0)7583 - 375465
Fax: ++49 (0)7583 - 375466
http://www.uismedia.de
http://www.mappetizer.de/traveldiary/
Upcoming releases
- altitude profile
- implementing other GeoNames WebServices (e.g. findNearbyStreet)
- geotagged photos on the map
- any suggestions?